
XNA Shader Programming
Tutorial 8 – Gloss map
Hi, and welcome to tutorial 8 of my XNA Shader Tutorial series. Today I’m going to give you better control on you specular highlights by implementing something called "Gloss map".
So, what is a gloss map?
A gloss map is really just a black and white texture. Our goal is to use this texture to say how much a texel/surface will reflect at a particular point, and a black and white texture gives us an easy way to do this.
Colors in a shader is given by the following format: r,g,b where each component can range from 0.0 to 1.0.
Also, having a black and white texture means that each component got the same value:
White=(1,1,1)
Light gray=(0.8,0.8,0.8)
Light gray=(0.8,0.8,0.8)
Dark gray=(0.2,0.2,0.2)
Black=(0,0,0)
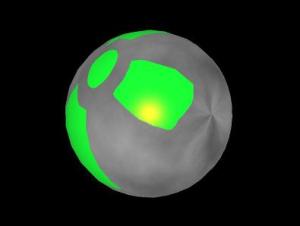
Glossmap example:

We want the specular highlight to be strongest where the color is white, gradually reducing at different levels of gray, to none specular highlight where the color is totally black.
Implementing the shader
We need to load the Specular highlight texture in XNA and pass it to the shader. From the shader, we need to take the glossmap color from the texel we are working on and store it in a variable:
float4 GlossMapColor = tex2D(GlossMapSampler, Tex);
Now, we need to use the GlossMapColor in order to decide how much specular color the texel will reflect:
// R = 2 * (N.L) * N – L
float3 Reflect = normalize(2 * Diff * Normal – LightDir);
float Specular = pow(saturate(dot(Reflect, ViewDir)), 20); // R.V^n
float3 Reflect = normalize(2 * Diff * Normal – LightDir);
float Specular = pow(saturate(dot(Reflect, ViewDir)), 20); // R.V^n
Now, notice that we have the maximum specular highlight stored in the variable "Specular". In order to reduce this, we need to somehow modify "Specular" in order to reduce it to the level we want. So how do we do this? You guessed right, by multiplying the Specular color with the GlossMapColor.
Now, remember GlossMapColor contains the black and white value of our glossmap texture, so each rgb-component got the same value.
This makes it possible to just use one of the components, and multiply it with "Specular" like this:
// R = 2 * (N.L) * N – L
float3 Reflect = normalize(2 * Diff * Normal – LightDir);
float Specular = pow(saturate(dot(Reflect, ViewDir)), 20); // R.V^n
Specular = Specular*GlossMapColor.x;
float3 Reflect = normalize(2 * Diff * Normal – LightDir);
float Specular = pow(saturate(dot(Reflect, ViewDir)), 20); // R.V^n
Specular = Specular*GlossMapColor.x;
I’m using the x component of "GlossMapColor" to multiply "Specular" with. GlossMapColor.x ranges from 0.0 to 1.0 and works like a percentage when multiplying with Specular.
So, if the glossmap is black, specular will be multiplied with 0.0, resulting in a specular value of 0.0. If it’s white, specular will remain unchanged and anything in between will make it more or less reflective depending on the grayness level of GlossMapColor.
Knowing this, we can proceed with our normal lighting equation:
return vAmbient + vDiffuseColor * ColorMapColor * Diff + vSpecularColor * Specular;
I have also added a colormap for this example just to make it more clear 🙂

So, where can I use gloss mapping?
Anywhere you want to control how reflective a surface is going to be! This can be a rusty iron mug where some parts are still reflective, while the rusty parts are less reflective. An old car, blank/rough ice and so on.
Thats it for today, and I hope you can see some use for gloss maps 🙂 Now, download the source and try it out for yourself!
NOTE:
You might have noticed that I have not used effect.commitChanges(); in this code. If you are rendering many objects using this shader, you should add this code in the pass.Begin() part so the changed will get affected in the current pass, and not in the next pass. This should be done if you set any shader paramteres inside the pass.
You might have noticed that I have not used effect.commitChanges(); in this code. If you are rendering many objects using this shader, you should add this code in the pass.Begin() part so the changed will get affected in the current pass, and not in the next pass. This should be done if you set any shader paramteres inside the pass.
Download: Executable + Source


vibram five fingers http://www.fivefingersrunning.comfivefingers running shoes http://www.fivefingersrunning.comvibram shoes http://www.fivefingersrunning.comfivefingers kso http://www.fivefingersrunning.com/vibram-fivefingers-kso-c-11.htmlvibram fivefingers kso http://www.fivefingersrunning.com/vibram-fivefingers-kso-c-11.html
This blog is very informative. I love blogging when it is for or about something I believe in. I also read news blogs often and find that it makes me feel more intelligent every time I read them. I also feel like I am a pretty good person who tries to treat others with respect, no matter what their opinion is. There are some real haters out there. Thanks again. I learned a few things about blogging. I will definitely put your site on my speed dial.Thanks http://www.vanjobb.huhttp://www.vanjobb.hu/mobilinternet.php?11http://www.vanjobb.hu/Bankbetetkamatok.php?22http://www.vanjobb.hu/nevnapokdatumszerint.php?39http://www.vanjobb.hu/nevnapoknaptar.php?41http://www.vanjobb.hu/nevnapok.php?40
I adore the site layout . How did you make it? Its so sweet.
I hope you will get around to translating this into XNA 4 soon. I’m learning so much from your tutorials. I’m going to attempt to do it myself, I hope this also forces me to learn even more.
Click Here, they used WordPress, duh.
Well I gave it my best shot. Your XNA 3.x code and HLSL code looks like it is written by a different person, all your naming conventions are different, you use different method of doing things, it is just too different for me to translate it. I hope you find the time to translate these to XNA 4 soon. All I can get it to do is a black screen in XNA 4. Thank you.