
XNA Shader Programming
Tutorial 16, Refraction

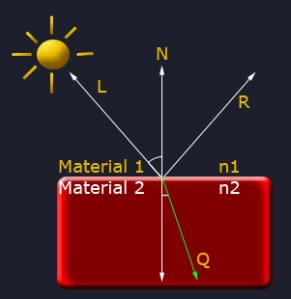
Where n1 and n2 is the index of refraction for each of the two materials, a1 is the angle between L and N, and a2 is the angle between Q and N.

Tutorial 16, Refraction
Welcome to tutorial 16 in the XNA Shader Programming tutorial. Today we are going to learn how to implement refraction. We are going to build on the environment mapping shader we made in tutorial 15, so be sure to understand what’s going on there first!
Source and executable can be found in the end of the tutorial.
Refraction
Refraction is the bending of light when light travels from one material into another, based on a change of speed, changeing the light’s direction. The amount of bending is based on the density of the materials( representing how fast the light travels through the material ) and is called "index of refraction". Refraction can be seen in the real world by putting a pen into a glass of water, when swimming, looking on a glass statue, in gems and so on.
Refraction is the bending of light when light travels from one material into another, based on a change of speed, changeing the light’s direction. The amount of bending is based on the density of the materials( representing how fast the light travels through the material ) and is called "index of refraction". Refraction can be seen in the real world by putting a pen into a glass of water, when swimming, looking on a glass statue, in gems and so on.
Every material got an index of refraction, and here is a table of some of them:
| Vacuum | 1.00000 |
| Air at STP | 1.00029 |
| Ice | 1.31 |
| Water at 20 C | 1.33 |
| Acetone | 1.36 |
| Ethyl alcohol | 1.36 |
| Sugar solution(30%) | 1.38 |
| Fluorite | 1.433 |
| Fused quartz | 1.46 |
| Glycerine | 1.473 |
| Sugar solution (80%) | 1.49 |
| Typical crown glass | 1.52 |
| Crown glasses | 1.52-1.62 |
Snell’s law ( wikipedia ) is a formula used to calculate refraction:
Where n1 and n2 is the index of refraction for each of the two materials, a1 is the angle between L and N, and a2 is the angle between Q and N.
Fig 16.1
HLSL got a function named refract, what we will use today. The refract faction applies Snell’s law to compute a refracted vector based on the incomming vector, the normal and the ratio between the two reafraction indices.
The ratio between n1 and n2 can be computed like this:
In our example application, we got light traveling through air and in to glass. If we look at the table, we can see that the index of refraction for air is 1.00029 and for glass, 1.52, resulting in a ratio of 0.66.
The refract function will return a vector, that can be used as a lookup vector into our cube mapped environment.
Implementing the shader
Let’s start with the vertex shader:
OUT VertexShaderRefract( float4 Pos: POSITION, float2 Tex : TEXCOORD, float3 N: NORMAL )
{
OUT Out = (OUT) 0;
Out.Pos = mul(Pos, matWorldViewProj);
Out.N = normalize(mul(matInverseWorld, N));
Out.V = vecEye – Pos;
return Out;
}
OUT VertexShaderRefract( float4 Pos: POSITION, float2 Tex : TEXCOORD, float3 N: NORMAL )
{
OUT Out = (OUT) 0;
Out.Pos = mul(Pos, matWorldViewProj);
Out.N = normalize(mul(matInverseWorld, N));
Out.V = vecEye – Pos;
return Out;
}
We need the Normal and the view vector to compute the refraction. We can use the light vector for the refraction as well, but in this case, I wanted to refract the view vector.
Next, we write the pixel shader for refraction.
float4 PixelShaderRefract(float2 Tex: TEXCOORD0,float3 L: TEXCOORD1, float3 N: TEXCOORD2, float3 V: TEXCOORD3) : COLOR
{
float3 ViewDir = normalize(V);
float3 Refract = refract(ViewDir, N, 0.66);
float3 RefractColor = texCUBE(ReflectionCubeMapSampler, Refract);
{
float3 ViewDir = normalize(V);
float3 Refract = refract(ViewDir, N, 0.66);
float3 RefractColor = texCUBE(ReflectionCubeMapSampler, Refract);
// return the color
return float4(RefractColor,1);
return float4(RefractColor,1);
}
In the pixel shader, we use refract to get the refraction vector for a material going from air to glass, and put it in a vector named Refract. Then we use Refract to lookup the pixel our view hits after being refracted once.
In many cases, you want to just add this functionality into another larger shader, including reflection, colors, bump-mapping and so on. In this tutorial, we are rendering and composing our scene in a post-process shader. We know that the transmittance shader takes a background texture containing the environment surrounding our transmitter, pass it in to our shader and uses this to calculate transmittance, right? Knowing this, we can add the refraction of our transmitter into the background render texture before passing it in to the transmittance shader, making a refraction map.
Now, we can use this background texture as the texture that will be displayed behind our transmitted mesh. We could have done this in many other ways, but just to keep things simple and on the point, we did it like this.
Also, we need the shaders technique:
technique RefractionMapShader
{
pass P0
{
VertexShader = compile vs_2_0 VertexShaderRefract();
PixelShader = compile ps_2_0 PixelShaderRefract();
}
}
technique RefractionMapShader
{
pass P0
{
VertexShader = compile vs_2_0 VertexShaderRefract();
PixelShader = compile ps_2_0 PixelShaderRefract();
}
}
That’s it for our refraction shader, quite simple ey? If you want to write your own function for refraction, feel free to do so! This gives you full control of your shader, and giving you the ability to refract the different components of RGB differently.
Here is a comparison between our glass objects. One is having reflection/transmittance and the other one is having reflection/transmittance and refraction:
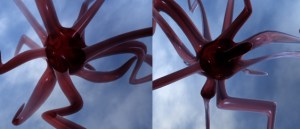
Left: Withour refraction, Right: With refraction.
Using the shader
Not much new here. We need to create a rendertarget and texture for our refraction map, and use this texture for our background texture in the transmittance shader.
//////////////////////////////
// render refraction map
graphics.GraphicsDevice.SetRenderTarget(0, RefractionRenderTarget);
graphics.GraphicsDevice.Clear(Color.White);
//////////////////////////////
// render refraction map
graphics.GraphicsDevice.SetRenderTarget(0, RefractionRenderTarget);
graphics.GraphicsDevice.Clear(Color.White);
spriteBatch.Begin(SpriteBlendMode.AlphaBlend, SpriteSortMode.Immediate, SaveStateMode.SaveState);
{
spriteBatch.Draw(BackGroundRenderTexture, new Rectangle(0, 0, 800, 600), Color.White);
}
spriteBatch.End();
{
spriteBatch.Draw(BackGroundRenderTexture, new Rectangle(0, 0, 800, 600), Color.White);
}
spriteBatch.End();
GraphicsDevice.RenderState.CullMode = CullMode.None;
effect.CurrentTechnique = refractMapShader;
effect.CurrentTechnique = refractMapShader;
DrawScene(true);
graphics.GraphicsDevice.SetRenderTarget(0, null);
RefractionRenderTexture = RefractionRenderTarget.GetTexture();
RefractionRenderTexture = RefractionRenderTarget.GetTexture();
Here we create the refraction map, taking the background texture, adding the refraction and saving it in a new texture named RefractionRenderTexture.
Now, when applying the transmittance post-process shader, we use this texture as the background texture:
Now, when applying the transmittance post-process shader, we use this texture as the background texture:
effectPost.Parameters["BGScene"].SetValue(RefractionRenderTexture);
NOTE:
You might have noticed that I have not used effect.commitChanges(); in this code. If you are rendering many objects using this shader, you should add this code in the pass.Begin() part so the changed will get affected in the current pass, and not in the next pass. This should be done if you set any shader paramteres inside the pass.
You might have noticed that I have not used effect.commitChanges(); in this code. If you are rendering many objects using this shader, you should add this code in the pass.Begin() part so the changed will get affected in the current pass, and not in the next pass. This should be done if you set any shader paramteres inside the pass.
Thats it for refraction! Any feedback is really apprechiated.


two ideas for you:
1) use forward and reverse depth peeling to render the front and back of the object
2) use chromatic dispersion (different refractive index per color channel)
then you get this: http://www.youtube.com/watch?v=aXHFOc-fyrc
Thanks, great video. Did you create that btw?
Buying a used car can be tricky, no matter how much you already know
about cars. There are lots of different
things to consider so that you don’t end up buying a piece of junk that breaks down right away. Use some great tips of the trade in the following article to help you make your next car choice.
Great post. I was checking continuously this blog and I am impressed!
Very helpful information particularly the last part 🙂 I care for such information
a lot. I was looking for this certain info for a very long
time. Thank you and best of luck.