Donate?
Topics
Balder3D Binary Man Commodore 64 CUDA Demoscene DirectX DirectX11 DirectX12 Fractal Game Camp Game programming Gaming General Graphics Grill Simulator 360 Kinect Math Parallel Computing Shaders Silverlight Spill Technology Tutorial Uncategorized Unity Windows 8 Windows 10 Windows Phone XNA XNA Shader Tutorialpetriw
Tweets by petriwBlogroll
-
Join 205 other subscribers
Meta
nVidia 3D Vision
I tried my nVidia 3D Vision device today, and I must say my first impressions was over all expectations.
I takes about 10 seconds before my eyes are adjusted to the depth but after that, the experience is great. I could see the cars in Need for speed shift pop out of my screen, tires after a crash blasting towards my face, making me dodge. I also tried Fallout 3 and Dragon Age, both really really great in full 3D!
But, what will you need to use these? Well, first of all, you need the nVidia 3D Vision kit and a compatible 3D card( I think you will at least need a geforce 9600GT ). Also, you will need a monitor with 120Hz, so you get 60Hz pr eye. The monitor I have is a Samsung 2233rz, and it work great with the 3D kit.
Posted in Technology
2 Comments
The Gathering 2010
I’m home from The Gathering 2010 after 3-4 long days of coding and holding presentations.
I think the presentations went well, and I happy so many showed up and listened. I think I have answer most of the mails I have received regarding the presentations, but as I get a lot of them I might have missed some of you. In that case, if you still haven’t heard from me yet, try sending the mail again! 🙂
Also, our PC-Demo "Crystalizium" by Dark Codex got 2nd place in the demo compo.
You can download the executable here, and a youtube video will be made once I get some better hardware!
Problems installing the DirectX SDK – Error S1010
I tried to install the February 2010 version of the DirectX SDK today but ran into troubles.
I downloaded the SDK from msdn using IE8, and got the installer started. After a few seconds of the installation progress, I got the error S1010 and the installation was terminated.
After searching around for the error message, I found the solution. Download the SDK using another browser.
I fired up chrome and started the download again, and started the installer.
Guess what, it worked!
Can someone explain this please? 😛
Anyway, I decided to put the solution on this blog in case anyone of you are having the same issues.
More information about this: http://joytek.blogspot.com/2009/11/installing-directx-sdk-error-s1010.html
Posted in DirectX
2 Comments
XNA Game Programming presentation at The Gathering 2010 source
First of all, I’d like to thank everyone for showing up at Marius B. and my presentation on XNA Game Programming today.
As promised, this is the sourcecode for the example application we made.. so, enjoy! 🙂
Posted in XNA
2 Comments
The Gathering 2010 starts tomorrow
Be sure to attend to some of my/our presentations at The Gathering 2010 this year.
I will be participating these sessions:
– Microsoft Surface presentation on Thursday, 16:15( Main stage ).
– Shader programming on Friday, 18:15 ( Creative Lounge 9
– Microsoft Surface presentation on Thursday, 16:15( Main stage ).
– Shader programming on Friday, 18:15 ( Creative Lounge 9
– XNA Game Programming with NITH ( Creative Lounge )
and I will be sitting in the Creative Lounge as one of the Mentors at The Gathering from April 1st, so Thursday will be my first day.
Hope to see you there! 🙂
Posted in Demoscene
5 Comments
Shader programming seminar at The Gathering 2010
I will be holding a Shader programming seminar at The Gathering 2010.
When: Friday 18:15 – 19:45
Where: Creative Lounge( starts at main stage )
Level: Advanced
Where: Creative Lounge( starts at main stage )
Level: Advanced
I will be talking about how you can write effects using shaders in HLSL, the algorithms used and how you can implement these in your own applications.
Hope to see many of you at The Gathering 2010 🙂
Posted in Demoscene
6 Comments
Windows Phone 7 Development – Tutorial 3, Moving sprites
Windows Phone 7 Development
Tutorial 3 – Moving sprites

Welcome back to the Windows Phone 7 Development tutorial!
Today we are going to move the sprite we created in tutorial 2 by changing the spritePosition vector. I also resized the sprite to 64×64 to make it a bit bigger. 🙂
What we will do is to change the spritePosition.X variable so our character moves from one side of the screen to the other. Once it reaches the left/right side of the screen, it will change the direction and move to the other side of the screen.
This tutorial will only focus on the Update function of our game, and a new function we will create named MoveCharacter.
All the code that will move our character will happen inside the MoveCharacter function. In order to make this run based on time( so our character won’t move faster on a device/computer that is faster than another device/computer), we will pass the gameTime timer from Update to the MoveCharacter function.
We start by adding the global variable spriteDirection to our global variables as an integer value of 1, and then creating the MoveCharacter function, add this function to our game class:
int spriteDirection = 1;
protected
void MoveCharacter(GameTime gameTime)
{
spritePosition.X += (float)gameTime.ElapsedGameTime.Milliseconds / 10.0f * spriteDirection;
if (spritePosition.X >= 400.0f)
spriteDirection *= -1;
if (spritePosition.X <= 50.0f)
spriteDirection *= -1;
}
This functions takes the gameTime variable, and adds the elapsed game time in milliseconds * spriteDirection to the X direction of our spritePosition. spriteDirection used to change the direction the character moves. If the characters is on the right side, we multiply the direction with -1, making the value spritePosition.X is added with, negative. This will make it move to the left side of the screen instead. If the character is on the left side of the screen, we multiply the negative value by -1 again, making it positive.
This will make the character move back and forth between X=50 and X=400.
Next, we will have to call the MoveCharacter(..) function we just created from the games Update() loop.
MoveCharacter(gameTime);
The code should look something like this:
Now, hit F5 to build, compile and deploy your game to the emulator and see it all in action!
And that ends this tutorial. It was very simple, but it sure creates some movements to our game!
Source/Binary: Tutorial 3
Posted in Windows Phone
1 Comment
Windows Phone 7 Development – Tutorial 2, Static sprites
Windows Phone 7 Development
Tutorial 2 – Static sprites
Step 1: Creating our sprite
First of all we will need a sprite that we can render:
Tutorial 2 – Static sprites
Today we are going to write a little bit of code. It will be very simple but it will get you started on rendering your own sprites.
So, what is a sprite?
A sprite is, simply, an image that is pre-rendered( like a jpg file ) that is rendered in to a larger scene. A sprite can be a hero you control, enemies, a background, a logo and so on.
fig 2.1 – A scene from Final Fantasy VI
In Fig 2.1, you can see a screenshot from the game Final Fantasy VI. This scene is build up by combining many sprites into a final image. We got sprites that represents the player characters, the enemy, the background and the interface. Even fonts might be rendered as sprites.
A sprite can have various dimensions, like a size of 32×32, 128×128, 32×64, 332×87, or simply NxM.
Let’s get started.
Step 1: Creating our sprite
First of all we will need a sprite that we can render:
This sprite is a 32×32 sprite, and will be used in our example.
Step 2: Creating our project
Start Visual Studio and create a new Windows Phone Game (4.0) project and give it a decent name.
Step 3: Adding our sprite to the project
XNA Game Studio 4.0 got two projects when first created:
– The game project
XNA Game Studio 4.0 got two projects when first created:
– The game project
The game project is where you write the code for your game, and the content project is where you add the resources you want in your game.
This is separated so you can use the same content project in different projects.
The Content References folder is used to reference a content project with your game project. When creating a new project using the Windows Phone template, a reference to the auto-generated content project is automatically added the Content References folder.

The Content References folder is used to reference a content project with your game project. When creating a new project using the Windows Phone template, a reference to the auto-generated content project is automatically added the Content References folder.

Let’s add our sprite to the content project.
A window pops up that let’s you select a file. Download the sprite above and select that file using the file selector window, and press OK. When this is done, you can see that the image is added to you project. Once the file is added to the content project, a number of properties is set to the file. To see these properties, right click on the file in the solution and select properties.
For now, the most important property is the "Asset name" property that is used to reference the given resource content at runtime.
Step 4: Loading the asset into memory
Next we will need to load our asset into memory. This is done by using a Texture object, and using our content project to get the sprite we want and copy it into the Texture object.
Let’s declare our texture object as a global variable. Add this code in the top inside our game class:
Vector2 spritePosition = new Vector2(100);
// This will contain our sprite.
Texture2D mySprite; // This is the coordinates of where we want to render our sprite.Vector2 spritePosition = new Vector2(100);
mySprite is the object that will load our texture, and spritePosition is the coordinates of where we want to render our sprite. In this case, we set spritePosition to contain 100 as the X value, and 100 as the Y value. We could also write that line of code as Vector2 spritePosition = new Vector2(100,100); instead, giving us the same result.
Now we will have to load our sprite from the content project and copy it into the mySprite variable. The XNA Framework contains a class that lets you access the content project and return any object you want. This is done by calling the Content.Load() function. Add this code to the LoadContent function inside your game class.
mySprite = Content.Load<
Texture2D>("wp7d2_02");What this does it to ask the Content project to return a object of the type Texture2D with the assetname of wp7d2_02, and store it in the mySprite variable.
Step 5: Render our sprite at the given coordinates
The last thing we need to do is to add some code that renders our sprite. This must be done in the Draw function of our game class. You might have noticed a object that is automatically added to our project, the spriteBatch object? This is what we will use to push sprites to our GPU for rendering. The spriteBatch contains a Begin and End function. To start rendering sprites, you will need to invoke the Begin function, then render all the sprites you want to render, and when you are done rendering sprites, you invoke the End method.
spriteBatch.Begin(
SpriteSortMode.BackToFront, BlendState.AlphaBlend);
spriteBatch.Draw(mySprite, spritePosition, Color.White);
spriteBatch.End();
As you can see from the code above, we begin rendering sprites by invoking the Begin method of our spriteBatch object, render our sprites using the Draw method of the spriteBatch object and end drawing sprites using the End() method of our spriteBatch object.
The parameters of Begin tells the spriteBatch to draw the first sprite behind the next sprite and so on. So the last sprite you draw will be the sprite that is on the top, and the BlendState is used to blend sprites together( more on this in a later tutorial ).
The first parameter of Draw is mySprite, the sprite we want to draw, the next is the 2d( x,y ) vector of where we want to draw our sprite, and the last is what color we want to have on the sprite. If you leave this to White, you will combine White with the color on our sprite which will not affect the color at all.
Next, let us change the color of our background from CornFlowerBlue to White by changing the following line of code:
GraphicsDevice.Clear(Color.White);
This line of code sets the background color of our game to white, hiding the white corners of our sprite as you can’t see through any part of the sprite yet.
I mentioned something about alpha earlier, and I won’t go in to spesific detailes yet, except that you can use alpha on a sprite to remove the parts of the sprite that you want to see through, making it possible to have an advanced image or a 3D space as you background to the sprite.
Your draw method should now look like this:
Now, if you press F5, you will see your game running, with a white background and your sprite standing still at position 100,100.
So that’s it for our static sprite rendering tutorial. I suggest you play around with the various parameters like setting the background color to different colors, the color on spriteBatch.Draw to something else, and even make your own sprite and render that!
Source/Binary: Tutorial 2.rar
Posted in Windows Phone
3 Comments
Windows Phone 7 Development – Tutorial 1, Getting started
Ok, most of you who are reading this blog might know that the Windows Phone 7 is on the way. During The Mix 2010 in Las Vegas, Nevada, Microsoft annouced that the tools that you need to develop on the Windows Phone 7(WP7) is free and available for download already now!
So this is my new tutorial series that I have been waiting a long time to write. This series will cover everything you need to create kick ass games on the new Microsoft Phone platform.
Windows Phone 7 development is quite easy as it builds on already existing technology; XNA and Silverlight.
If you are creating 3D games, or 2D games that will use a lot of sprite rendering, XNA is the weapon of choice. If you are wiriting business applications, or simple 2D games, Silverlight is the way to go.
As my blog is mostly about game programming, and I’m XNA/DirectX MVP, my natural choice in this tutorial is to use XNA for WP7 development.
So this first part of this tutorial series is how you can get started, get everything you need installed and running your first WP7 application.
Let’s get started! 🙂
Step 1 – Downloading the installer
For downloading the tool, you will need to navigate to this page or go to Microsoft’s Windows Phone 7 development site(opens in new window).
Scroll down to the bottom of the page and click download on the VM_BOOT\vm_web.exe file and run the file.
Step 2 – Installing the Windows Phone Developer Tools
When you run the file, the first thing that appears is the agreement screen. Read this and click the Accept button( if you accept the agreement ) to be taken to the next step.


The next step is where you start installing the application. Click the "Install Now" button and it will start downloading the tools, and install it to your computer.
Or, if you need to customize the installation, click the "Customize" button. This let’s you specify the path of where you want the tools installed on your HDD. Now click the Install button to start the installer!
Note: The download is a >300MB download, and the installer might ask you to reboot your computer during the installation, so pay some attention once the download is complete!

Once the installer completes, the installation complete screen will display. From here, you can either close the installer, or start the application. Click the "" button to load Visual Studio 2010 Express for Windows Phone.

Step 4 – Running the tool
Once the installer is complete, you can run it from the tool like we did in the previous step. You can also start the tool by running the exe file, or use the start menu. The application is installed under the "XNA Game Studio 4.0" folder.
Step 5 – Creating a new Windows Phone project
Once Visual Studio 2010 Express for Windows Phone is running, you can create new projects, or open existing ones. In this tutorial, we will create a new project.
This can be done by clicking the "New Project" button, or by clicking File->New Project.
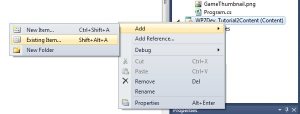
From here you can select what template you want the new project to use. On the left side of the screen, under Visual C#, click "XNA Game Studio 4.0" to display all Windows Phone projects related to XNA Game Studio 4.0.
Select the Windows Phone Game (4.0), give it a name and a path to where you want the project to be installed before clicking "OK".
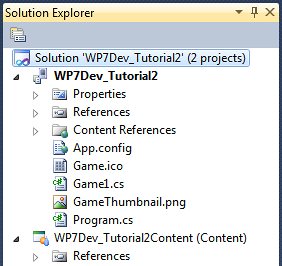
Now, you got a new XNA Game Studio 4.0 Windows Phone project created in Visual Studio 2010.
Step 6 – Running your first WP7 game
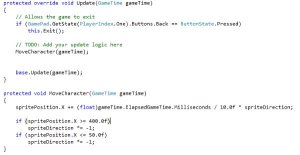
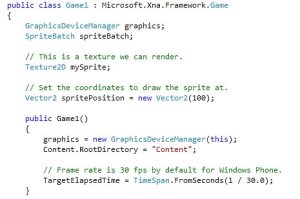
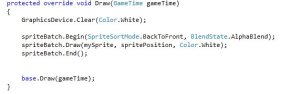
Now, you got the default new project code generated. This code includes everything you need to run you first Windows Phone 7 game! So all you got to do is to press F5 to compile, build and run you game.
Congratulations on creating and running your first WP7 "game".
The next tutorial will cover some basics and get you started with writing some code on this cool new platform from Microsoft!
Enjoy!
Source/Binary: N/A
Posted in Uncategorized
1 Comment


