As some of you know, Dark Codex Studio and Tumbleweed is creating the game myBeast for the popular iPhone platform. After a long process, Dark Codex Studio was one of the selected companies to get support from Norsk Filmfond, for the myBeast project. With a sum of 100.000 NOK, the development of myBeast will be a lot easier as Dark Codex is a new DA company.
I got my copy of Dragon Age Origins this other day, but are still waiting for the release on PS3..
So far, the game is really great. Back in the earlier days I played a lot of Baldur’s Gate and Neverwinter nights and I’m sure this game will be just as great. At least I’m hooked so far.. The graphics is awesome!!!
I’m playing as a Human Rouge, going for archery for a start, but guess I will try all the start stories to see what’s the most fun and then move from there.
Anyway, I spent a few days in Finland earlier this week as I’m on a project for Nokia, and will be going back there tomorrow so it won’t be much time for gaming.. Guess Dragon Age got to wait a few more days..
So, it’s been a while since last time I was blogging. This is because I have been VERY busy with work as I’m rolling of the Telenor Way of Work project. From next week I will work more with UI/UX both in Norway and Finland. Looking forward to this 🙂
Anyway, a lot is still happening and the next Game Camp is under development. More info will come later. Also, the book about 3D Game Development with Silverlight is out and can be ordered here. This book is really great, contining all you need to get started with Silverlight game programming, including 3D using Balder Engine, and physics, lot’s of examples. Be sure to check this out!
Welcome to the XNA Shader Programming Tutorial 24. Today, we are going to implement a bloom effect. The shader will be a post process shader, and will bloom any given texture. I learned blooming from http://xna.creators.com, so this implementation is based on this example.
What is Blooming?
Well, blooming occurs when colors flows over to surrounding pixels, brightening or overexposing them in the process. The dark pixels on the edges of bright pixels will get affected by the bright pixels, making the dark pixels lose some details. Fig 24.2 shows the difference between a scene with bloom (left) and one without bloom (right).
Fig 24.2 – Difference between bloom an non-bloom scene
We will need a few render targets to archive the bloom effect. First is the original scene, then we will one texture that will contain the blooming and two textures that will contain the blurred version of the bloom scene.
The 1st blur texture will blur the bloom texture once, and the 2nd blur texture will blur the 1st blur texture, creating a better looking blur. Our blur shader is not the best way of blurring but its good enough. If you want to create a more advances blur effect, look up “Gaussian blur”.
The first thing we will do is to render the normal scene to a texture. Next, we need to extract the bright areas in the original scene and store it in another texture named BloomTexture.
We will use a shader to extract the bright colors. What this shader will do is to get a pixel from the original scene, and based on a threshold variable, calculate if this color is bright enough for the blooming effect.
saturate((Color – Threshold) / (1 – Threshold));
Threshold will contain a value between 0.0 and 1.0, and is used to remove colorinformation from Color that is below Threshold. Fig 24.3 – the content of bloom texture
Fig 24.3 contains our bloom texture, based on the original scene with a Threshold of 0,3f. As you can see, the scene removes everything dark( based on Threshold ) and keeps the rest.
Listing 10 – Bloom.fx // This shader gets the areas that are bright. This will later be blured making bright spots “glow”
sampler TextureSampler : register(s0);
// Get the threshold of what brightness level we want to glow
// A post process shader only needs a pixel shader.
PixelShader = compile ps_2_0 PixelShader();
}
}
Next, we will need to blur this scene. We will use the same blur effect as we used in tutorial 23 (blur), but this time we will use it two times to blur the scene a bit better. Fig 24.4 shows the 2x blurred version of our blooming texture.
Fig 24.4 – Blurred version of our bloom texture
The last thing we will do is to combine the original scene with the blurred bloom texture. We could just have rendered the original scene, and blended the bloom texture over it to combine the original scene with the bloom texture, but this would not look that good and we would have non flexibility in the combination process. So, what does this mean? You guessed right, we will make a new shader that will combine the two textures!
This shader will have four parameters that you can use to control the combination process. These are the intensity of our bloom texture and the original scene texture, and the saturation of the original scene texture and the bloom textures. // Controls the Intensity of the bloom texture
float BloomIntensity = 1.3;
// Controls the Intensity of the original scene texture
float OriginalIntensity = 1.0;
// Saturation amount on bloom
float BloomSaturation = 1.0;
// Saturation amount on original scene
float OriginalSaturation = 1.0;
We give them a default value, but you can control this from the application that will use this shader.
Next, we create a function that will help us with color saturation (the difference of a color against gray, or its own brightness). This function will saturate a given input color, based on a saturation value and the gray color we used to make a grayscale scene earlier in this article.
// We define gray as the same color we used in the grayscale shader
float grey = dot(color, float3(0.3, 0.59, 0.11));
return lerp(grey, color, saturation);
}
Let’s move on, and start on the PixelShader function. We start by getting the color from our blurred bloom texture, and the original scene. // Get our bloom pixel from bloom texture
Using these parameters, you can make the original scene very dark, and only bloomed areas bright and vice versa. You should play around with these values to see how this works!
We continue the pixel shader by darkening the original scene where the bloomColor is bright, so we avoid making these areas burned-out.
originalColor *= (1 – saturate(bloomColor));
Now, the final step is to combine the textures.
return originalColor + bloomColor;
No magic behind this, just return the two colors added together!
And boom you got bloom! Pretty simple, right? All we do is really just combining a few simple shaders to create an advances effect.
Listing 11 – CombineBloom.fx // This combines the bloom texture with the original scene texture.
// BloomIntensity, OriginalIntensity, BloomSaturation and OriginalSaturation is used
// to control the blooming effect.
// This shader is based on the example in creators.xna.com, where I learned this technique.
// Our bloom texture
sampler BloomSampler : register(s0);
// Our original SceneTexture
texture ColorMap;
// Create a sampler for the ColorMap texture using lianear filtering and clamping
sampler ColorMapSampler = sampler_state
{
Texture = <ColorMap>;
MinFilter = Linear;
MagFilter = Linear;
MipFilter = Linear;
AddressU= Clamp;
AddressV= Clamp;
};
// Controls the Intensity of the bloom texture
float BloomIntensity = 1.3;
// Controls the Intensity of the original scene texture
Welcome to the XNA Shader Programming Tutorial 23. Today, we are going to implement a simple version of blur. The shader will be a post process shader, an will blur any given texture.
Implementing the Shader
To blur a scene, we will need to implement a new post process shader that will take the average of a number of the pixels neighbor pixels, and return that color as the color we want the player to see. The blur shader will have a distance variable that will be used to modify the texture coordinate we will use as a lookup texture containing our normal scene, so it takes the top-left, top-right, bottom-left and bottom-right pixel, adds them together and divides it by 4 so we get the average.
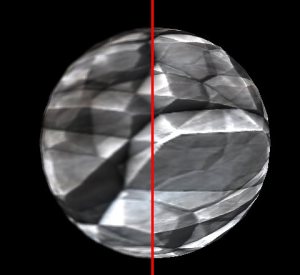
On the image, you can see the blur shader in effect. The shader takes the average of the surrounding pixels with a given distance (in this case 0.002) set in the shader or in the application.
Fig 23.2 – This shows how the blur shader works( From tutorial 19 )
The following piece of code looks up the pixels surrounding the current pixel that is being processed. Color= tex2D( ColorMapSampler, float2(Tex.x+BlurDistance, Tex.y+BlurDistance));
Color += tex2D( ColorMapSampler, float2(Tex.x-BlurDistance, Tex.y-BlurDistance));
Color += tex2D( ColorMapSampler, float2(Tex.x+BlurDistance, Tex.y-BlurDistance));
Color += tex2D( ColorMapSampler, float2(Tex.x-BlurDistance, Tex.y+BlurDistance));
We simply just modify the pixel to grab the surrounding pixels and add it to our color. Next, we need to divide color by 4 so we get the average color. Color = Color / 4;
Listing 23.1 – Blur post process shader // The blur amount( how far away from our texel will we look up neighbour texels? )
float BlurDistance = 0.002f;
// This will use the texture bound to the object( like from the sprite batch ).
sampler ColorMapSampler : register(s0);
float4 PixelShader(float2 Tex: TEXCOORD0) : COLOR
{
float4 Color;
// Get the texel from ColorMapSampler using a modified texture coordinate. This
// gets the texels at the neighbour texels and adds it to Color.
Color += tex2D( ColorMapSampler, float2(Tex.x-BlurDistance, Tex.y-BlurDistance));
Color += tex2D( ColorMapSampler, float2(Tex.x+BlurDistance, Tex.y-BlurDistance));
Color += tex2D( ColorMapSampler, float2(Tex.x-BlurDistance, Tex.y+BlurDistance));
// We need to devide the color with the amount of times we added
// a color to it, in this case 4, to get the avg. color
Color = Color / 4;
// returned the blurred color
return Color;
}
technique PostProcess
{
pass P0
{
// A post process shader only needs a pixel shader.
PixelShader = compile ps_2_0 PixelShader();
}
}
This was a pretty simple blur effect. You can also create blur effects by rendering to a downscaled texture. You can downscale multiple times to create a nice blur. You could also use this shader and blur a texture multiple times to create a better looking blur.
I have added a line crossing the scene, where the left side of the line is the blurred scene, and the right side of the screen is the original scene.
I will wite a tutorial on Gaussian Blur later, as this blur effect is not very nice. But to get better results with this shader, you can blur a scene multiple times using this shader.
I have received some really good feedback regarding my shader tutorials. Some of them contained errors regarding the normal mapping examples, where Rich-Talbot have been a great help.
I have updated the examples, and as you can see, the normal mapping shader has become much better! 😉
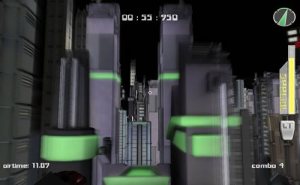
Break a Leg is a really fun and addicting 1st person platform/action game created by a Norwegian team from NITH. In this game, you have to move through a city by breaking the laws of physics, using jump-pads on top of buildings, a lot of coordination, creativity and air-time, on the shortest time possible.
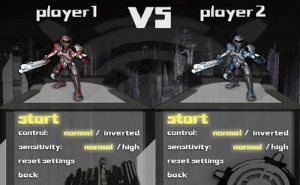
The graphics look great, and the levels have been designed in a really great way, making one level fun to play for many many hours( yeah, I did that ). You must race agains time, a ghost of your previous best run or your friend in two-player mode.
You can read more about the game on gamer.no (Norwegian), or on the developers journal (Norwegian), or best of all: Try the game for yourself on your own computer!
Thank you for considering giving a small donation! Any donations is really apprechiated, and will go to creating more content and tutorials on this blog.