XNA Shader Programming – Tutorial 21, Transition: Fade

XNA Shader Programming
Tutorial 21 – Transition: Fade
Hi, and welcome to Tutorial 21 of my XNA Shader Programming tutorial. Today I will present to you the first transition tutorial, where I will play one scene, and then fade in to another one using a simple post process shader!
 
The Fade transition
The fade transition can be seen in many movies, games and power point presentations( ++ ) when going from one scene/slide into another one. Scene A is playing, and then a new Scene B fades in while Scene A fades out, making a smooth fade between the scenes.
 
This can be very usefull in many different situations, like in your games cut-scenes or when moving from one menu to another and so on.
 
Implementing the shader
Ok, the fade transition shader is really easy to implement and you might allready have a few solutions on your head.
We need to have two textures in our shader, one for each scene you want to fade between, and then you will need to have a variable that will be used to tell how far in the fade we are.
This variable must be between 0 and 1, and when the variable is 0, Scene A will play, and when its 1, Scene B will play.

Lets start writing the shader:

sampler ColorMapSampler : register(s0);

texture ColorMap2;
sampler ColorMapSampler2 = sampler_state
{
   Texture = <ColorMap2>;
   MinFilter = Linear;
   MagFilter = Linear;
   MipFilter = Linear;  
   AddressU  = Clamp;
   AddressV  = Clamp;
};
 
float fFadeAmount;

Here we define two texture samples, ColorMapSampler1 and ColorMapSampler2, and both will contain a scene that we will fade between using the variable named fFadeAmount. The texture samplers is defined in two different ways, and is explained in a previous tutorial.

 
Now, we are ready to implement the pixel shader. Remember, as this is a post process shader, we don’t need to write a custom vertex shader.
// Transition
float4 PixelShader(float2 Tex: TEXCOORD0) : COLOR
{
 float4 Color = tex2D(ColorMapSampler, Tex); 
 float4 Color2 = tex2D(ColorMapSampler2, Tex); 
 
 float4 finalColor = lerp(Color,Color2,fFadeAmount);
 
 // Set our alphachannel to fAlphaAmount.
 finalColor.a = 1;
  
 return finalColor;
}
 
What we do here is to get the colors from each of the two scenes, and use lerp to mix them. the fFadeAmount variable is used to control where in the fade we are. 0 is 0% in the fade, displaying only SceneA. If it’s 0.3 we are 30% in the fade, displaying both SceneA and SceneB. SceneA will be 70% and SceneB will be 30% in the fade.
Finally, we need to create our technique:
 
technique PostProcess
{
 pass P0
 {
  // A post process shader only needs a pixel shader.
  PixelShader = compile ps_2_0 PixelShader();
 }
}
 
And thats it for the Transition: Fade shader!
 
Using the shader
When we want to use the shader, we will need to render the two scenes we want to fade between in to a texture, and pass them in to the shader:
spriteBatch.Begin(SpriteBlendMode.AlphaBlend, SpriteSortMode.Immediate, SaveStateMode.SaveState);
{
    // Apply the post process shader
    float fadeBetweenScenes = ((float)Math.Sin(m_Timer) * 0.5f) + 0.5f;
    effectPost.Parameters["fFadeAmount"].SetValue(fadeBetweenScenes);
    effectPost.Parameters["ColorMap2"].SetValue(Scene2Texture);
    effectPost.CommitChanges();
    effectPost.Begin();
    {
        effectPost.CurrentTechnique.Passes[0].Begin();
        {
            spriteBatch.Draw(SceneTexture, new Rectangle(0, 0, 800, 600), Color.White);
            effectPost.CurrentTechnique.Passes[0].End();
        }
    }
    effectPost.End();
}
spriteBatch.End();
 
What we do here is to use the texture set when rendering the sprite as SceneA and another texture set by a parameter to the shader as SceneB, and then we have a periodical function to fade between these based on a given timer, so fFadeAmount is somewhere between 0 and 1.
 
And thats it for the Transition: Fade shader! Pretty easy compared to a few of the other shaders we have written, right? 😉

Any comments and feedback is greatly apprechiated!

YouTube – XNA Shader programming, Tutorial 21 – Transition: Fade
 

Posted in XNA Shader Tutorial | 3 Comments

Few updates due to visitors

I’d just like to share with you guys that I have some visitors from Finland this week, and because of that I won’t have the time to update my blog and answer e-mails. I’ll try my best to answer as many as I can, but I can’t promise anything.
But, a new tutorial will be posted next week, so be sure to check back then! 😉
Posted in General | Leave a comment

Texture support in Balder

Balder now got support for textures! You can read more about it, and see a real-time example of it, on the following blog entry by Einar Ingebrigtsen:
http://www.ingebrigtsen.info/post/2009/05/19/Balder-gets-its-long-awaited-texture-support.aspx
 
This looks really neat and the engine have progressed a lot during the last few weeks 🙂
Posted in Balder3D | Leave a comment

XNA Shader Programming – Tutorial 20, Depth of field

XNA Shader Programming
Tutorial 20 – Depth of Field
Hi, and welcome to Tutorial 20 of my XNA Shader Programming tutorial. This tutorial will cover a simple post process Depth of Field effect.
This shader is pretty fast, considering that a Depth of Field effect can be pretty heavy to calculate.

As the shader is a post process effect, it can easily be implemented in any scene, without having to reprogram a lot or program the scene around the effect.

 
Depth of Field
Depth of Field( DoF ) is an effect that you probably see every day. If you stare at something, you can see that the foreground and background of the object you are staring is getting unclear. This happens using a camera aslo, where you have to adjust the focus so the thing you want to take picture of looks clear and not blurry. I took a fast image with my camera just to show you the effect:
 
The front part of the bottle is in-focus, and the background is out-of-focus. The in-focus plane is called the in-focal-plane.

Now, how can we implement this in XNA?
First of all, we need a way to get the depth of any point in the scene. This is a perfect opportunity for the depth buffer to show us it’s magic skills( see tutorial 14 ).

 
Then we need two versions of our scene on a texture, one being the normal scene we can see when everything is in focus, and then a blurred version of the scene that will be seen when the whole scene is out of focus.

To blur a scene, we will need to implement a new post process shader! This shader will take the average of a number of the pixels neighbour pixels, and return that color as the color we want the player to see. The blur shader will have a distance variable that will be used to modify the texture coordinate we will use as a lookup texture containing our normal scene, so it takes the top-left, top-right, bottom-left and bottom-right pixel, adds them together and devides it by 4 so we get the average. More on this later!

On the image, you can see the blur shader in effect. The shader takes the average of the surrounding pixels with a distance( in this case 0.003 ) set in the shader.

Next, to blur the scene even better, we will use the blurred texture and render it to another texture using the same post process blur shader. This will result in the scene being blurred twice as much!
Another tip to blurring is to downscale a rendertexture multiple times, but I decided to use a shader for this instead!
 
Now, we got a few textures. One containing the scene, one containing the 2xBlurred version of the scene, and one depth texture, whats next? Is this all we need? Yeah! But, we need to find a way to show the blurred scene where the scene is out-of-focus, the normal scene when it’s in-focus, and a mix of those two where the scene is in-between.

For this, we will need something that describes where we want to have the focus point( distance from the eye ), the range of the focus( how quickly will we go from in-focus to out-of-focus? ), our cameras near clipping plane and the a modified version of the cameras far clipping plane. The modified Far clipping plane is calculated by taking the given Far clipping plane( say 300 ), and devide it by ( Far – Near ). If near is 1, we get 300/(300-1). This will convert the far clipping plane to a correct range [0,1] for use in the next equations.

The following equations will use a given distance and range to calculate what will be in-focus:

[20.1]
 
Here, we take the negative of our near clipping plane and multiply it with the modified far clipping plane, and deviding it by how far away the focal-point is, subracted by the modified far clipping plane. Next, we use this to calculate how far this point is from the distance point we set in the shader, fading out based on the Range value.
This returns a value between 0 and 1, where the value is 0 if it’s in focus, and 1 if it’s out-of-focus. I rendered the values here, where the range is pretty small( 10 ) and a distance of 70 units from the eye:
 
Now, we can use this texture to display the blurred scene where it’s white, the normal scene where it’s black, and a mix where it’s gray, using interpolation( lerp ).
 
Implementing the shader
We got three shaders in our application. The first one is a depth texture shader covered in tutorial 14, the 2nd is the blur post process shader, and the last one is the Depth of Field shader.

Let’s start with the blur-shader:
// The blur amount( how far away from our texel will we look up neighbour texels? )
float BlurDistance = 0.003f;

// This will use the texture bound to the object( like from the sprite batch ).
sampler ColorMapSampler : register(s0);
 
float4 PixelShader(float2 Tex: TEXCOORD0) : COLOR
{
    float4 Color;
 
    // Get the texel from ColorMapSampler using a modified texture coordinate. This
    // gets the texels at the neighbour texels and adds it to Color.
    Color  = tex2D( ColorMapSampler, float2(Tex.x+BlurDistance, Tex.y+BlurDistance));
    Color += tex2D( ColorMapSampler, float2(Tex.x-BlurDistance, Tex.y-BlurDistance));
    Color += tex2D( ColorMapSampler, float2(Tex.x+BlurDistance, Tex.y-BlurDistance));
    Color += tex2D( ColorMapSampler, float2(Tex.x-BlurDistance, Tex.y+BlurDistance));
    // We need to devide the color with the amount of times we added
    // a color to it, in this case 4, to get the avg. color
    Color = Color / 4; 
 
    // returned the blurred color
    return Color;
}
 
Here we take the average of the neighbour pixels, on a given range( 0.003 ), and return this, resulting in a blurred scene.
 
Next, we need to implement the Depth of Field shader.
We first need to declare a few variables that will be used to calculate whats in focus and whats not:
float Distance;
float Range;
float Near;
float Far;

Then we need the usual textures:
sampler SceneSampler : register(s0);
texture D1M;
sampler D1MSampler = sampler_state
{
   Texture = <D1M>;
   MinFilter = Linear;
   MagFilter = Linear;
   MipFilter = Linear;  
   AddressU  = Clamp;
   AddressV  = Clamp;
};

texture BlurScene;
sampler BlurSceneSampler = sampler_state
{
   Texture = <BlurScene>;
   MinFilter = Linear;
   MagFilter = Linear;
   MipFilter = Linear;  
   AddressU  = Clamp;
   AddressV  = Clamp;
};
 
Now, we are ready to start implementing the post process effect:
float4 PixelShader(float2 Tex: TEXCOORD0) : COLOR
{
 // Get the scene texel
 float4 NormalScene = tex2D(SceneSampler, Tex);
 
 // Get the blurred scene texel
 float4 BlurScene = tex2D(BlurSceneSampler, Tex);
 
 // Get the depth texel
 float  fDepth = tex2D(D1MSampler, Tex).r;
 
 // Invert the depth texel so the background is white and the nearest objects are black
 fDepth = 1 – fDepth;
 
 // Calculate the distance from the selected distance and range on our DoF effect, set from the application
 float fSceneZ = ( -Near * Far ) / ( fDepth – Far);
 float blurFactor = saturate(abs(fSceneZ-Distance)/Range);
 
 // Based on how far the texel is from "distance" in Distance, stored in blurFactor, mix the scene
 return lerp(NormalScene,BlurScene,blurFactor);
}

Whats happeing here is that we take the pixel color from the normal scene, the blurred scene and the inverse of the depth texture as we want the distant objects to be white and the near objects to be black before starting on the next calculations:
 float fSceneZ = ( -Near * Far ) / ( fDepth – Far);
 float blurFactor = saturate(abs(fSceneZ-Distance)/Range);

 
Here we use equation 20.1 to calculate whether the pixel is in-focus or not, placing the result for the current pixel in blurFactor.

now, using blurFactor, we can lerp between the color in the normal scene( will be fully visible if blurFactor is 0 ) and the blurred scene( will be fully visible if blurFactor is 1 ).
 return lerp(NormalScene,BlurScene,blurFactor);

And that’s it!

Using the shader

To use the shader, we will need to render the depth buffer texture, the normal scene texture and the blurred scene texture. Then we need to set the shaders parameters, so it contains the distance and range we want.

In this case, we know the camera is about 80 units away from the spinning squidlike objects center, so we set the distance to about 70, with a range of 10 giving us a rather small in-focus part.
void  SetShaderParameters( float fD, float fR, float nC, float fC )
{
    focusDistance = fD;
    focusRange = fR;
    nearClip = nC;
    farClip = fC;
    farClip = farClip / ( farClip – nearClip );

    effectPostDoF.Parameters["Distance"].SetValue(focusDistance);
    effectPostDoF.Parameters["Range"].SetValue(focusRange);
    effectPostDoF.Parameters["Near"].SetValue(nearClip);
    effectPostDoF.Parameters["Far"].SetValue(farClip);
}
 
That’s it for our 1-pass depth of field shader. As you can see, it’s pretty simple to make and don’t require too many calculations and performance loss!
In the example, you can use the XBox controler’s right thumbstick to change the distance and range values of the shader, and the left thumbstick to rotate the model.
 
Posted in XNA Shader Tutorial | 7 Comments

Game Camp user group went great

Yesterdays Game Camp event went great. The amount of participants was much higher than anticipated so I’m really satisfied!
I started on my Shader tutorial, and will continue this next time as well.
 
The audience consisted mostly of students from NITH, both developers and game designer.
 
The fun thing was that I got some great feedback from the game designers, as they got an introduction to what they can expect from a game programmer when designing a game. Also, Thomas gave them an update on iBeast, Project Silvershine, showed us how a design document can look like and game design in general.
 
One of the teams that I had a workshop for showed up as well, and after the event, they showed me the game they were working on. They had successfully managed to implement the technique I learned them, and it was fun to see how much they had progresses since last time. Good work guys!!
 
Anyway, I got some plans for the next event, where we will focus on how to get an idea, design it, make the graphics and implement the game, and publish it. I’m looking forward to this presentation, but first I will need to create a cool game for the presentation. So, be sure to check this out!
Posted in Game Camp | Leave a comment

Preparing for tomorrow

It’s less than 24 hours before tomorrows Game Camp User Group start, and most of my spare time have gone into preparing for this.
I will try to record the event and put it on a stream so those who want can see the event as well!
 
Once the event is over, I got more time to write tutorials and answer mails, so please be patient as I will try and answer all of them!
 
Anywa, im off to bed, it’s going to be a long day tomorrow!
 
 
See you at the Game Camp User Group! 😉
Posted in XNA | 1 Comment

XBox360 Performance Monitoring

I have seen many different ways students and others are making to check the performance of their xbox game, and some statistics, whom do not know that XNA Game Studio includes a tool to do exacly this!
 
The tool is named "XNA Framework Remote Performance Monitor" and can be found under Tools in XNA Game Studion 3.0 on your start menu. This tool is really valuable for any XNA Game developer so use it 🙂
 
So, how do you use it??
Set the xbox to wait for connection in xna game studio( on your xbox ).
1: open the tool from the start menu( on your PC ):
 
Enter the assembly title of the project( can be seen in Properties\AssemblyInfo.cs in you solution overview.


When clicking OK, the game will start and statistics will be displayed!


Thats it 🙂

Posted in XNA | 1 Comment

GS360 to Peer review

Phew, what a week-end. Been sick, and tried to finish grill simulator.
I have tried to make the game crash but without luck, so I didn’t see any other way than to let someone else try and sent the game for Peer review!
I hope some bugs will be found, but if not, the game will be available on Xbox Live Community Games!
 
This is the first game we deliver to XBLC, so it’s quite exiting to move through this whole process, as we learn a lot by doing this.
 
I’m off to playtest a few games before spending some time away from the computer.
 
Have a nice sunday! 😉
Posted in Grill Simulator 360 | Leave a comment

XNA Shader Programming – Tutorial 19, Hemispheric ambient light

XNA Shader Programming
Tutorial 19, Hemispheric ambient light
Hi, and welcome to Tutorial 19 of the XNA Shader Programming tutorial!
Today I’m going to change the way we calculate our ambient light, so it gets a little more realistic than a flat light.
 

The source can be found on the bottom of the article.

Hemispheric ambient light
Usually we use ambient intensity and ambient color to calculate our ambient color. This works in most situations, but we might want to add some realism to it. In the real world, a lot of the light we see comes from reflections in the environment, and not only light sources. Light from the sky, the grass below you, from the car on your left are all parts of what color gets reflected from a surface.
 
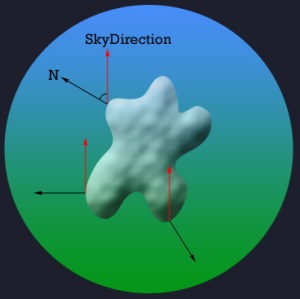
Hemispheric ambient light represents a simple and easy solution to this. By making a vector that represents the direction to the sky( color above the surface ), and calculating the angle between this vector and the normal of the surface, we can find what color gets reflected by the surface. So, if the surface is having a normal pointing down, and the sky vector us up ( 0, 1, 0 ), the surface will get the color of the ground below the object.
 
                                                                    Fig 19.1
The red vectors are pointing to the sky, and the black vectors are the normals to different parts of a surface.


Implementing the shader
First of all, we need to declare some global variables. This is the direction to the sky, the color of the sky, the color of the ground and the intensity of the hemispherical light.
 
// Set the direction to the sky
float3 SkyDirection = float3(0.0f,1.0f,0.0f);
// Set ground color
float4 Gc = float4(0.5f,1.0f,0.5f,1.0f);
// Set sky color
float4 Sc = float4(0.5f,0.5f,1.0f,1.0f);
// Set the intensity of the hemisphere color
float Hi = 0.7f;
 
The sky color and the ground color could be fetched from a cubemap or another form of a lookup table, making it more realistic. But in this case, I want to keep it simple so you learn the lesson. 😉
 
Next, we must calculate our new ambient term:
float vecHemi = (dot(N, SkyDirection) * 0.5f ) + 0.5f;
float4 HemiFinal = Hi* lerp(Gc, Sc, vecHemi);
return (Ai*Ac*HemiFinal*Color)+(Color*Di*Dd);
 
The first thing we do is to take the dot-product of our SkyDirection vector and the surface normal N.
Then we use this to lerp between the ground color and sky color, based on the angle between SkyDirection and N, and multuiply this with the intensity of our hemispherical ambient light.

Now, we add this to our ambient calculation. I want to keep the old ambient light to have some more control on the ambient light color itself, and multiplying this with the hemispherical light.
To only use the hemispherical ambient light, we could return this equation instead:
return (HemiFinal*Color)+(Color*Di*Dd);

 
Thats it for the shader. The only thing we do with it is to take the angle between our surface normal and the sky, and then calculate if that surface will be colored by the sky, the ground or something between them( lerp ).
 
Using the shader
Nothing new here. The parameters are coded into the shader, but can be set from outside the shader as the variables are defined in global space in the shader.
 
NOTE:
You might have noticed that I have not used effect.commitChanges(); in this code. If you are rendering many objects using this shader, you should add this code in the pass.Begin() part so the changed will get affected in the current pass, and not in the next pass. This should be done if you set any shader paramteres inside the pass.
 
 
Posted in XNA Shader Tutorial | 2 Comments

XNA Shader Programming – Tutorial 18, Multiple Point Lights

XNA Shader Programming
Tutorial 18, Multiple Point Lights

Hi, and welcome to Tutorial 18 of the XNA Shader Programming tutorial!
Today we are going to build on the Point Light+Self-Shadow shader we made in tutorial 17, and luckily for us, there are not any new theories for us to implement in order to have n-lights!

Source and executable can be found on the bottom of the article.

Multiple Point Lights
To implement multiple( n ) point lights, we need to use our light equation n times in our shader. So, if we have 3 lights, we have to calculate diffuse, specular, self-shadow and attenuation for each of those three lights. Let’s take a look at this light equation:

As you can see, this is the exact same light equation as in tutorial 17, except that we sum the shadow, diffuse, specular and attenuation for each lightsource.

Say we have 3 lights, one violet, one green and one blue positioned around our object, this would be the result:

                                                                                  Fig 18.1
Not very hard ey?
To sum up, we just do what we have learned previously n-times!

Implementing the shader
We need to calculate each step in our lighting equation n-times. In this example, I have implemented 3 light sources. This means I need to send in 3 light positions, ranges and colors in to the shader:
float4 LightColor;
float4 LightColor2;
float4 LightColor3;
float3 vecLightPos;
float3 vecLightPos2;
float3 vecLightPos3;
float LightRange;
float LightRange2;
float LightRange3;

Next, in the vertex shader, we need to calculate the distance between the surface and the light source, transform our lights to tangent space( normal mapping ) and calculate the attenuation for each of our lights:
// calculate distance to light in world space
float3 L = vecLightPos – PosWorld;
float3 L2 = vecLightPos2 – PosWorld;
float3 L3 = vecLightPos3 – PosWorld;

// Transform light to tangent space
Out.Light.xyz = normalize(mul(worldToTangentSpace, L));  // L, light
Out.Light2.xyz = normalize(mul(worldToTangentSpace, L2));  // L2, light
Out.Light3.xyz = normalize(mul(worldToTangentSpace, L3));  // L3, light

// Add range to the light, attenuation
Out.Light.w = saturate( 1 – dot(L / LightRange, L / LightRange));
Out.Light2.w = saturate( 1 – dot(L2 / LightRange2, L2 / LightRange2));
Out.Light3.w = saturate( 1 – dot(L3 / LightRange3, L3 / LightRange3));

Nothing new here right? Do the same thing you did in tutorial 17 three times!
Let’s take a look at the pixel shader. First of all we need to calculate the light direction for each light:
// Get light direction/view from vertex shader output
float3 LightDir = normalize(L.xyz); // L
float3 LightDir2 = normalize(L2.xyz); // L2
float3 LightDir3 = normalize(L3.xyz); // L3

Then we calculate the diffuse, specular and self-shadowing, using the parts/equations in 18.1.
// diffuse
float D = saturate(dot(N, LightDir));
float D2 = saturate(dot(N, LightDir2));
float D3 = saturate(dot(N, LightDir3));

// Self shadow – used to avoid light artifacts
float Shadow = saturate(4.0 * LightDir.z);
float Shadow2 = saturate(4.0 * LightDir2.z);
float Shadow3 = saturate(4.0 * LightDir3.z);
   
// reflection
float3 R = normalize(2 * D * N – LightDir);  // R
float3 R2 = normalize(2 * D2 * N – LightDir2);  // R
float3 R3 = normalize(2 * D3 * N – LightDir3);  // R

// specular
float S = min(pow(saturate(dot(R, ViewDir)), 3), Color.w);
float S2 = min(pow(saturate(dot(R2, ViewDir)), 3), Color.w);
float S3 = min(pow(saturate(dot(R3, ViewDir)), 3), Color.w);

Now we got what we need in our light equation. Let’s use 18.2 to implement find our final color:
// calculate three point lights:
// Ambient +  Shadow*((Diffuse + Specular)*Attenuation in L.w);
float4 light1final = Shadow*((Color * D  * LightColor + S*LightColor) * (L.w));
float4 light2final = Shadow2*((Color * D2  * LightColor2 + S2*LightColor2) * (L2.w));
float4 light3final = Shadow3*((Color * D3  * LightColor3 + S3*LightColor3) * (L3.w));
return 0.1 * Color + light1final + light2final + light3final; 

And thats it! So, basically, you need to calculate our light equation n-times to get n lights.

Using the shader
There ain’t much difference to using this shader and the one we implemented in tutorial 17. But this time we need to pass the light position, light color and light range for each of the three lights we are implementing, instead of just one:
// Set the light positions for each of the lights
effect.Parameters["vecLightPos"].SetValue(vLightPosition);
effect.Parameters["vecLightPos2"].SetValue(vLightPosition2);
effect.Parameters["vecLightPos3"].SetValue(vLightPosition3);

// Set the light range and color for each of the lights
effect.Parameters["LightRange"].SetValue(3.0f);
effect.Parameters["LightColor"].SetValue(vLightColor);
effect.Parameters["LightRange2"].SetValue(3.0f);
effect.Parameters["LightColor2"].SetValue(vLightColor2);
effect.Parameters["LightRange3"].SetValue(3.0f);
effect.Parameters["LightColor3"].SetValue(vLightColor3);

NOTE:
You might have noticed that I have not used effect.commitChanges(); in this code. If you are rendering many objects using this shader, you should add this code in the pass.Begin() part so the changed will get affected in the current pass, and not in the next pass. This should be done if you set any shader paramteres inside the pass.

Now, go ahead and look at the source and play around with it so you learn it by practice. If you got any questions or feedback, please leave a comment or cantact me!

YouTube – XNA Shader programming, Tutorial 18 – Multiple Point lights
  

Download: Executable + Source

Posted in XNA Shader Tutorial | 5 Comments