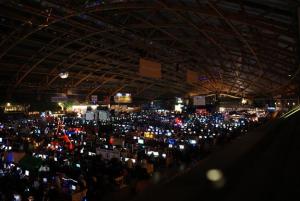
Just wanted to share some pictures taken at The Gathering 2009 🙂
An ocean of computers.. over 5000 😉
From left to right: Steffen aka. kroz, Egil aka. higen, Petri aka. digitalerr0r( yeah me 😛 ),Thomas aka. sabotender, Stian aka. Gifster, Lars aka. RawBacon and Paul aka. MadeInPixels. Egil and me suffers from .. too little sleep and too much coding but im happy with this years The Gathering, we had lots of fun, and won some prizes 🙂
Me coding some last minute( those last minutes went on for 9 hours, after most of the group went to sleep 😛 ) changes in the democode. Sabotender is making faces in the background.
After many hours at the stand, im ready to do some more coding and getting our demo done.
This tutorial builds on Tutorial 9, post process wiggling. If you haven’t read that yet, you should in order to fully understand what’s going on here.
The source-code and binaries can be found in the end of the tutorial.
Noise/Distortion
In this tutorial, we are going to add some Noise/Distortion to our scene.
To add some noise/distortion to your scenes, we must add a distortion value to out texture coordinates, and when modified, we must use the new texture coordinate to look up into a texture sampler.
We also want to animate the noise, so we would need a timer that will affect the distortion amount, and we must have a value that indicats how much we want to distort our image, and a seed that will be used in the distortion algorithm.
Implementing the shader
Now, let’s implement this little shader!
First of all, we need to declare some global variables in our shader:
// This will use the texture bound to the object( like from the sprite batch ). sampler ColorMapSampler : register(s0);
// A timer to animate our shader float fTimer;
// the amount of distortion float fNoiseAmount;
// just a random starting number int iSeed;
ColorMapSampler is our rendered scene, fTimer is our timer, fNoiseAmount is a value that indicates how much the scene will be distorted. A value between 0.001 to 0.5 is pretty good, and lastly, our seed value that will be used when calculating the noise.
Next, we need to add some logic to our pixel shader. First of all, we need to calculate our noise factor:
This is just a "random" math formula that takes our seed, timer and the texture coordinates to make the random value different between our pixels. Feel free to play with this in order to archive differnt effects.
We are also using a new function here: fmod(x,y).
This function returns the floating-point reminder of x diveided by y.
Next, we need to calculate how much the distortion will affect each x and y component. We want these to be slightly different to make it look a little randomized:
This is our post process shader: // Global variables // This will use the texture bound to the object( like from the sprite batch ). sampler ColorMapSampler : register(s0);
// Use our distortion factor to compute how much it will affect each // texture coordinate float DistortX = fmod(NoiseX,fNoiseAmount); float DistortY = fmod(NoiseX,fNoiseAmount+0.002);
// Create our new texture coordinate based on our distortion factor float2 DistortTex = float2(DistortX,DistortY);
// Use our new texture coordinate to look-up a pixel in ColorMapSampler. float4 Color=tex2D(ColorMapSampler, Tex+DistortTex);
// Keep our alphachannel at 1. Color.a = 1.0f;
return Color; }
technique PostProcess { pass P0 { // A post process shader only needs a pixel shader. PixelShader = compile ps_2_0 PixelShader(); } }
NOTE: You might have noticed that I have not used effect.commitChanges(); in this code. If you are rendering many objects using this shader, you should add this code in the pass.Begin() part so the changed will get affected in the current pass, and not in the next pass. This should be done if you set any shader paramteres inside the pass.
This tutorial builds on Tutorial 9, post process wiggling. If you haven’t read that yet, you should in order to fully understand what’s going on here.
The source-code and binaries can be found in the end of the chapter.
Grayscale Image
In order to make a black and white image/scene, we will need to convert our colored SceneTexture to a nagative one. This is done in a post process pixel shader.
A black and white image consist of only pixels with a shade of gray, so our shader must somehow take a color, and make it to a shade of gray. There is a few ways of doing this, and Im going to show you two of them.
1. Average color
One way of doing this is to take the three color channels, add them together and devide the result on 3. This gives us the average color, and we set all components of our color to this average color:
Color.rgb = (Color.r + Color.g + Color.b)/3;
This will result in a pixel with all components set to the same value. It gives a pretty good result, but if you look closely, it’s incorrect! Let’s take a look on an other method of doing this.
2. Grayscale intensity
The eye is more sensitive to one color component, green, than towards the others and so on. One of the most common ways of converting an image to grayscale is to use a set of values that describe the grayscales intensity/weight for each of the three color components:
g = 0.3 R + 0.59 G + 0.11 B
This will convert our grayscale image correctly, and can be implemented in the shader like this:
I have added this figure as a comparison on the two different grayscale methods. It’s a little hard to see in this example but it can be seen in a more colorful scene, or one that contains more green.
Implementing the shader
We have seen how to convert a color to grayscale. I’v also added the shaders for both methods, so you can see the whole picture without having to download the example.
1. Average color
sampler ColorMapSampler : register(s0);
float4 PixelShader(float2 Tex: TEXCOORD0) : COLOR { float4 Color = tex2D(ColorMapSampler, Tex);
NOTE: You might have noticed that I have not used effect.commitChanges(); in this code. If you are rendering many objects using this shader, you should add this code in the pass.Begin() part so the changed will get affected in the current pass, and not in the next pass. This should be done if you set any shader paramteres inside the pass.
Thats about it, if you have any inputs on this one, please leave a comment, or send me an e-mail on petriw(at)gmail(dot)com
This tutorial builds on Tutorial 9, post process wiggling. If you haven’t read that yet, you should in order to fully understand what’s going on here.
The source-code and binaries can be found in the end of the chapter.
Negative Image
This shader is also very simple, but, I got a lot of questions about this so I decided I wanted to write a short tutorial on it.. and it’s really short 😉
To get the color from a texture sampler, you usually do this: float4 Color = tex2D(ColorMapSampler, Tex);
To get the negative color, you simply subracts each channel on Color with one, or, simply: float4 ColorInverse = 1.0f – tex2D(ColorMapSampler, Tex);
And, thats it!
Implementing the shader
Let’s start by implementing the shader. Its pretty short so I’ll just add the code:
sampler ColorMapSampler : register(s0);
// Negative image float4 PixelShader(float2 Tex: TEXCOORD0) : COLOR { float4 Color = 1.0f – tex2D(ColorMapSampler, Tex);
// Keep our alphachannel at 1. Color.a = 1.0f;
return Color; }
technique PostProcess { pass P0 { // A post process shader only needs a pixel shader. PixelShader = compile ps_2_0 PixelShader(); } }
First, we subtract the color from our sampler, from 1.0f to get the inverse.
But, when doing this, we are inverting the Alpha channel as well. If this is what you want, go ahead, but if you want to keep the alpha-values from the original image, you must set it back to what it was, or set it to something manually.
In this case, we want the image to have the alpha of 1.0, so we set the a component of Color to 1.0, making our image fully opque if we have shading enabled.
Thats it for this tutorial. I’ll keep adding some post process effects during the next days so keep comming back 🙂
NOTE: You might have noticed that I have not used effect.commitChanges(); in this code. If you are rendering many objects using this shader, you should add this code in the pass.Begin() part so the changed will get affected in the current pass, and not in the next pass. This should be done if you set any shader paramteres inside the pass.
Welcome to the 9th tutorial in my Shader Programming series. Today we are going to look at a pretty simple but cool post process effect!
It’s hard to see the result in the image, so you should download the example and take a look at the result so you understand what we are about to make.
The source-code and binaries can be found on the bottom of this article.
Post processing?
Post processing is really just about applying an effect, or a combination of effects to a image/frame/video to make it look more polished, or to have a certain effect. A post process effect can be looked at as a filter the scene is going trough. In this case, we are rendering a scene to a texture and applying a wiggling effect to the scene. This makes the scene look like it’s "underwater".
To make this happen, we need to modify our texture coordinate vector using some sort of a circle movement, and then use the modified texture coordinate to look up the color in our ColorMapSampler! Take this image for example:
The green points are just some example texture coordinates, and based on a timer, we can circulate this point around. Doing this on all texture coordinates will give us the wiggling effect we want!
The scene in our example contains a backdrop rendered using SpriteBatch, and a 3D model using our Diffuse shader from Tutorial 2. This scene is rendered into a texture, and that texture is used to render the scene. When rendering it, we apply our post process shader.
So, all in all, we got two shaders. One for the in-scene object, and one that will be used as the post process shader.
Implementing the shader
The post process shader only needs one shader, the pixel shader. To make the shader dynamic, we will need to implement a timer.
float fTimer;
This timer will be set from the application, and will be used in our sin/cos movment of every texture coordinate, making them move around! 🙂
We also need the ColorMap texture for the shader, containing our scene and is updated every frame. sampler ColorMapSampler : register(s0);
Now, we got what we need for our shader! Lets take a look at our short pixel shader function:
float4 Color = tex2D(ColorMapSampler, Tex); return Color; }
This shader simply takes the X and Y component of the current Texture Coordinate, Tex, and moves them around in a circle. the fTimer+Tex.x in the sin loop is there so the coordinate moves based on the timer, pluss the Tex.x to make the circle different for every step in the X-direction. We do the same thing with Y.
If we had used sin(fTimer)/cos(fTimer) in stead of including Tex.x/Tex.y, all texture coordinates would have been moving in the exact same circles. You should try this, and play around with the parameters so you fully understand why we are doing this.
Finally, we will need our technique, named PostProcess:
It’s pretty simple to add our shader to whatever scene we want! Just render the scene into a texture:
RenderTarget2D
renderTarget; renderTarget = new RenderTarget2D(graphics.GraphicsDevice, pp.BackBufferWidth, pp.BackBufferHeight, 1, graphics.GraphicsDevice.DisplayMode.Format); graphics.GraphicsDevice.SetRenderTarget(0, renderTarget); // Render our scene graphics.GraphicsDevice.SetRenderTarget(0, null); SceneTexture = renderTarget.GetTexture();
Where SceneTexture is a Texture2D object.
Now, we must display the scenetexture, and applying the post process effect:
spriteBatch.Begin(SpriteBlendMode.None, SpriteSortMode.Immediate, SaveStateMode.SaveState); { // Apply the post process shader effectPostOutline.Begin(); { effectPostOutline.CurrentTechnique.Passes[0].Begin(); { effectPostOutline.Parameters["fTimer"].SetValue(m_Timer); spriteBatch.Draw(SceneTexture, new Rectangle(0, 0, 800, 600), Color.White); effectPostOutline.CurrentTechnique.Passes[0].End(); } } effectPostOutline.End(); } spriteBatch.End();
And thats it! We got a very simple, but pretty cool post process effect. You should play around with the shader so implement your own post process effects. Try editing the circle each texture coordinate moves in! U guess you can come up with a quite cool distortion effect 😉
NOTE: You might have noticed that I have not used effect.commitChanges(); in this code. If you are rendering many objects using this shader, you should add this code in the pass.Begin() part so the changed will get affected in the current pass, and not in the next pass. This should be done if you set any shader paramteres inside the pass.
Just wanted to spend a few minutes on some regular questions I get.
1: SpriteBatch and SaveState
First of all, the SaveState on the sprite batch.
When you are using the Begin() method of the SpriteBatch class, it will set some of the render/device states to different values. Once you call the End() method of the SpriteBatch object, the render states will not, by default, be restored. This can result in some wierd artifacts that makes your 3D models( if you render 3D and 2D ) look wierd, especially considering the UV-coordinates.
This can lead to a lot of frustration, but luckily, the solution to this is pretty simple:
Here we use the SaveStateMode.SaveState to sve the state of our device. Once we call End(), the state that was saved in Begin will be restored!
2: AudioEngine, playing music is randomly crashing!??
Just got one comment on this one. Did you remember to update your AudioEngine instance? Say your instance is named audio, this problem can most of the time be solved by just calling this function from your Update loop:
Grill simulator 360 have now been handed in for PlayTest at the XNA-Creatos club( http://creators.xna.com ). Im happe I’m this far with the game and hopefully, there will be some testers!
So, if you are a premium member of XNA and have some time on your hands, would you like to review my game, please? 🙂 If so, here is the URL: http://forums.xna.com/forums/t/29521.aspx
TV Norge, a norwegian TV channel had a program about The Gathering. They had some clips from The Gathering 2005, where one of the short clips they showed was our demo "Time machine" on the big screen.
The Gathering is over, and I want to thank everybody who stepped by the Creativia Workshop area, and joining #tg-creativia @ EFnet! I belive we helped many ppl with OpenGL, DirectX, XNA, HLSL, GLSL, music, art and so on and I guess there will be a stand next year as well! 🙂
Anyway, our PC-Demo, Amplexus Primordia was released and ranked 4th! I’m very satisfied with this as the level on the competition was quite high. We got a lot of good feedback like:
"Amazing progress over the last year. Keep it up! "
"Great! your progress is amazing and inspiring! "
"Certainly the "breakthrough performance" of this years’ TG. Congrats guys 🙂 "
Thank you for considering giving a small donation! Any donations is really apprechiated, and will go to creating more content and tutorials on this blog.